Detailed tutorial on configuring overseas proxy IPs in a fingerprint browser!
The use of fingerprint browsers with overseas proxy IPs has become a common strategic technique for cross-border e-commerce, social media management, data scraping, and multi-platform account operations. This approach enhances user privacy, prevents account bans, and bypasses geographic restrictions. This article provides a detailed guide on configuring overseas proxy IPs in a fingerprint browser, aiding in managing and optimizing global social media, cross-border e-commerce, and other platform accounts.
Choosing a Fingerprint Browser
Before configuring, it’s essential to choose the right fingerprint browser. The CtrlFire anti-detection browser is a leading option in the market, designed for multi-platform account security, automation, and growth acceleration. CtrlFire offers effective protection for social media and e-commerce accounts, preventing detection and bans, making it ideal for secure multi-account management using overseas proxy IPs.
Steps to Configure Overseas Proxy IPs
- Install CtrlFire: Download and install the latest version of CtrlFire on your computer from the official website.
- Obtain a Valid Overseas Proxy IP: CtrlFire offers cost-effective global IP resources, providing clean and reliable IP sources. Once an overseas proxy IP is purchased, you can configure each window with an individual IP address. Here are the detailed steps:
- Register and log in to the desktop app using your email. Click “Create Account” on the homepage and choose “Create Individually.”
- Configure window names, account information, fingerprint settings, and select default options for other settings.
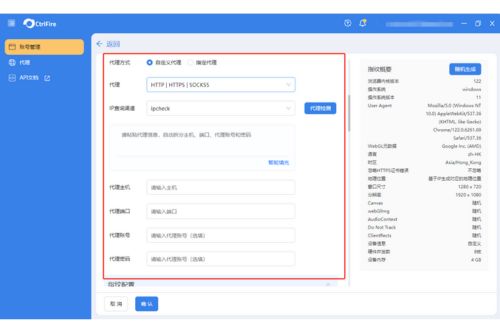
- Assign an individual proxy IP to each window by selecting either local or HTTP/HTTPS/SOCKS5 format.
- Choose an IP verification source (Ip.sb or ipcheck).
- Enter the proxy host and port, and optionally provide the proxy account and password, then save to complete the IP configuration.
Verifying the Proxy IP Configuration
After configuration, check the browser IP address to confirm that it has been changed to the proxy IP. This ensures that the user’s true IP and device information remain hidden, making online activities untraceable.
Following these steps enables you to configure overseas proxy IPs in a fingerprint browser effectively, helping mask real IPs, prevent fingerprint detection, and enhance browsing speed. This setup offers strong support for global operations.
Whether for social media management, cross-border e-commerce, or other multi-account scenarios, CtrlFire provides robust support and protection to help expand and maintain your digital business securely and efficiently. Download CtrlFire now to experience its powerful multi-account security management features!


